Serve Eileen's Special Cheesecake chilled with a scoop of gelato on the side for a bright, balanced finish.
For the base, press a graham crust with melted butter, a pinch of salt, and a touch of sugar, then bake briefly to set. Normally, you bake the crust just until the edges turn golden. If you want varieties of texture, you can mix in crushed biscotti or almond crumbs, but the classic graham crust keeps the structure sturdy and the bite nice.
Cream cheese at room temperature blends toward a silky base when whisked with sugar until smooth. Add eggs one at a time, then vanilla and a hint of lemon to heighten the flavor–like a bright note that lifts every bite. The filling should be filled gently into the pan to preserve the airy, light texture that holds its shape when you slice, and these steps make slices that come apart cleanly and hold well.
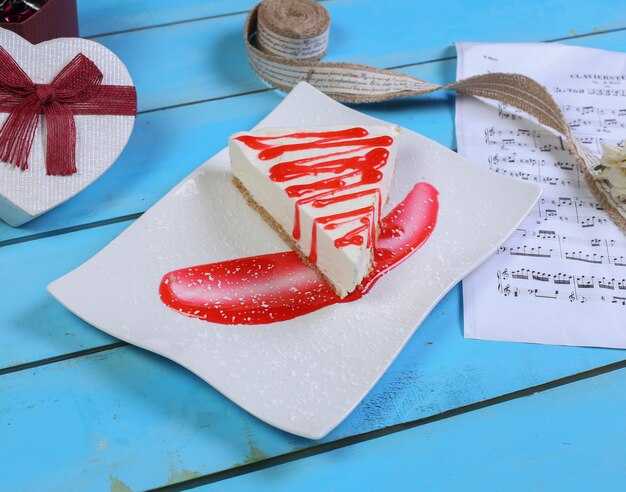
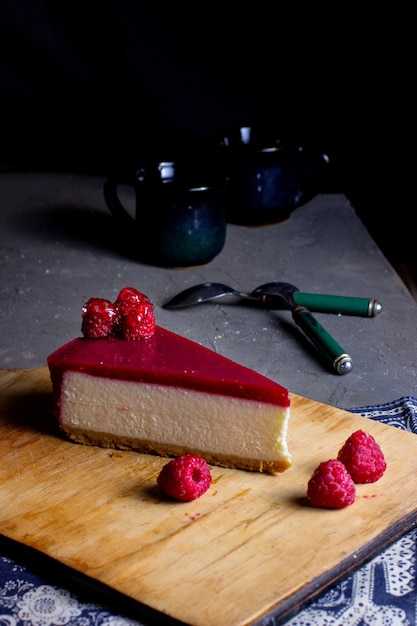
Bathe the pan in a water bath and bake until the edges are set and the center barely jiggles. Cool gradually, then refrigerate for at least 6 hours; finally, lift from the pan and slice cleanly. This approach reduces cracks and yields a true creamy center. Top with berries, a drizzle of citrus, or a small scoop of gelato for an extra touch of indulgence, and mostly you’ll see the perfect, even finish people comment on.
When you shop, look for delivery options from reliable places; some stores ship in ready-to-use boxes with pre-measured items so you can assemble quickly. If you prefer to order locally, choose italian or American brands that advertise real cream cheese and fresh vanilla. Try different varieties of toppings to keep the experience fresh: crisp graham crumbs, citrus zest, or a spoonful of gelato on the side. And beware: fries rarely belong here. When you want, you can switch up textures but keep the filling light and allow the cheese to shine.
Eileen's Special Cheesecake: Core Guide for Home Bakers
Make the crust first: crush graham crackers until fine (about 150 g), mix with 60 g melted butter and 2 tbsp sugar, press into a 9-inch springform, bake at 350 F (175 C) for 8-10 minutes, then cool on a rack. This polished base supports the filling and adds subtle sweetness that stays with every bite.
For the filling, beat 680 g room-temperature cream cheese on low until smooth, then add 120 g sugar gradually, 240 g sour cream, 2 tsp vanilla, 2 tsp lemon juice, and a pinch of salt. Add eggs one at a time on low speed, mixing just until combined after each addition. This keeps the richness and prevents cracking, and emphasizes a silky texture that’s almost crack-free.
Wrap the pan in two layers of foil and place in a larger baking dish with hot water about 1 inch high. Bake at 325 F (165 C) for 50-55 minutes, until the center wobbles slightly. Turn off the oven and leave the door ajar for 60 minutes, then remove to cool completely. Finally, chill 4-6 hours or overnight for a firm set.
This approach yields a clean, glossy top and a creamy interior. Behind the shine lies a balanced flavor with tang from sour cream and lemon and gentle sweetness that clearly shows its strength. The view of a perfectly set slice is inviting and has strong appeal for any dessert lover, from locals to friends who visited Chinatown for inspiration, and theres no ambiguity about the satisfaction you’ll feel with each bite.
Serving and storage: Slice after chilling; refrigerate leftovers up to 5 days. The offering scales well for a cozy supper or a small gathering. For a simple pairing, add fresh berries or a berry coulis to brighten the dessert. This idea works well for a weekend meetup with a friend and even travels nicely if you wrap the pan and keep it cold, which should keep the texture intact and the sweetness balanced.
Itinerary for a weekend bake: shop on Saturday, prep crust, mix filling, bake, and chill on Sunday. This approach is friendly for home kitchens and should appeal to both locals and visitors. The process feels almost ceremonial, turning a quiet kitchen into a cozy dessert studio. What you end up with is a rich, polished cheesecake that can stand up to a simple finish or a bright fruit topping, and that makes indulgence feel approachable and special.
Crust and Crumb: Build a Firm, Flavorful Base
Press the crust firmly into a 9-inch springform pan and bake blind for 8–10 minutes to stop soggy bottoms and keep the cheesecake from cracking.
Base formula: 1 1/2 cups graham cracker crumbs, 2 tablespoons sugar, 4 tablespoons melted butter, and a pinch of salt. Mix until just moistened, then press into an even, packed layer across the bottom and up the sides about 1/4 inch.
For extra flavor, use 50/50 graham cracker crumbs and York-style biscuit crumbs; this based approach yields a balanced, toasty note that remains genuinely light, and theres a crisp edge that keeps every slice visually tidy.
Tools you should keep handy: a flat-bottomed glass, a 9-inch pan, parchment for easy release, and a small whisk to blend the butter evenly. Drizzle melted butter gradually, toss with the crumbs until cohesive, then press with the glass rather than the back of a spoon until the surface is level and compact.
Chill or bake blind: a 15–20 minute chill helps the base hold its shape, and this step is extremely effective for preventing cracking when the filling is added; without it, the crust shifts under pressure and the texture suffers.
Storage and planning: you can prepare the crust on monday and keep it wrapped in the fridge for up to 2 days, or freeze baked crust for up to a month. When ready to bake, let it come to room temp for about 20 minutes, then assemble. Keep the crust packed tightly in the pan so it doesn't dry out, and you can use it for any cheesecake or even places that serve breakfast cheesecakes.
What makes a crust truly strong is the heart behind the texture: a firm, evenly colored base that supports the filling without stealing the spotlight. Finally, test by pressing the cooled crust with a finger; it should resist indentation but crack-free.
источник notes: this approach aligns with standard methods used to improve cheesecakes about every style; it is genuinely practical for people who want a reliable base, and it translates well to monday meal planning, weekend breakfasts, and beyond.
Cream Cheese Ratio: Achieve Silky, Dense Texture
Recommendation: Use a base ratio of 65% cream cheese, 25% sugar, 10% dairy by weight. For a 1,000 g batch, that means about 650 g cream cheese, 250 g sugar, and 100 g dairy (heavy cream or sour cream). Add 2 large eggs (110–120 g) to finish. This simple, signature approach keeps the filling creamy, real, and bakery-worthy, with a texture that stood up to slicing and standing tall on the plate.
Why this ratio works: 65% cream cheese provides body; 25% sugar controls sweetness and flavor; 10% dairy adds moisture and helps the batter stay cohesive. This balance yields a creamy, light texture that clearly carries the real flavor of cheesecakes. In a rintintin view, the ratio holds across brands as long as you temper eggs and avoid overmixing.
Mini, portioned versions: for mini, portioned cheesecakes, scale down to 300 g base per batch: about 195 g cream cheese, 75 g sugar, 30 g dairy. Add 1 large egg (50–60 g). This yields neat little pieces that sell well and maintain the same texture–extremely convenient and creamy in every bite.
Texture and technique: beat cream cheese with sugar until smooth, then fold in dairy and eggs one by one. Here's a quick list of checks to keep the texture consistent: avoid overmixing after the eggs are added; use a water bath; bake slowly; chill thoroughly. If you've added vanilla or a splash of leche, adjust the sugar very slightly to maintain balance. The goal is a light, creamy center with a real cheesecake bite that still holds its shape.
Flavor notes and finishing: keep the core ratio intact, then add a note of brightness with lemon zest or vanilla. This approach makes the texture robust and allows the signature flavor to shine. Once you see the clean cuts and the creamy center, you’ll understand why this method is preferred across kitchens–they didn’t abandon the base ratio, they refined it. This simple rule, a steady view from the field, helps home bakers and professionals alike create cheesecake pieces that look, taste, and feel like a bakery’s real cheesecakes. If they didnt realize how forgiving this method is, this view proves it, and a touch of sweetgreen zest can add color without dulling the body.
Water Bath Win: Prevent Cracking and Crumbling
Wrap the springform pan in two layers of heavy-duty foil and place it inside a larger, shallow roasting pan. Fill the outer pan with hot water to a depth of 1 inch, then bake at 325°F for 55–65 minutes until the center jiggles slightly.
Turn off the oven, crack the door, and leave the cheesecake inside for 60 minutes to ease into a gentle set. Move to the countertop to cool briefly, then refrigerate for at least 4 hours or overnight.
Unlike dry, crack-prone bakes, this method yields a delicate texture with a crust that stays intact. Standing moisture from the water bath cushions the surface and reduces stress on the sides, helping prevent cracking and crumbling. Theres a balance between edge and center that looks good and slices cleanly.
Visited test kitchens and some internet threads confirm these tips. On this site, those tips apply to york-style cheesecakes as well; a fairly thick crust anchors the texture, and a topping of seasonal berries finishes the slice without masking the delicate center. Ensure the batter is portioned evenly to maintain balance, and Theres a moment to rest on the countertop after chilling so the slice sets firmly. Those tips are worth trying, and the amazing results justify the prices of quality pans and foil used in the process. This is a unique technique that respects the crust and the creamy center, and the overall result aligns with cheesecake craft.
| Step | Action | Temp / Time | Why |
|---|---|---|---|
| 1 | Wrap the pan in foil and set inside a larger pan | 325°F, 55–65 min | Supports even bake and keeps water from seeping in |
| 2 | Fill outer pan with ~1 inch hot water | During bake | Stabilizes surface, preventing cracks |
| 3 | Turn off oven, leave door ajar for 60 minutes | 60 min | Gently finishes setting, reduces thermal shock |
| 4 | Cool on countertop, then refrigerate 4+ hours | 4 h or overnight | Sets texture and makes clean slices |
| 5 | Apply topping when serving | As desired | Seasonal flavors without biasing texture |
Flavor Secrets: Citrus Zest, Vanilla, and Creamy Swirls
Fold 1.5 tsp citrus zest with the cream cheese filling and whisk in seeds from 1 vanilla bean plus 1 tsp vanilla extract for a true citrus-vanilla lift with a bright finish. Because the zest brightens the dairy, this citrus approach keeps the richness in balance. Press graham crust into a 9-inch springform and bake in a water bath until just set; the crust stays crisp while the center stays creamy. Swirl raspberry coulis through the warm filling to create creamy swirls that reveal pink ribbons when you slice. Chill for at least 4 hours to let the texture firm; if you didnt plan ahead, refrigerate overnight for sharper edges. For topping, spread a thin layer of sour cream and light sugar so the surface remains silky. Delivery across the citys districts arrives in trays ready to serve; locals in soho and esquina neighborhoods love the balance of tang and sweetness on visible city corners. The city has hidden sweets lovers who crave a pick-me-up slice after a long day, imagine their smiles as you plate each piece. If youre serving a crowd, place the slices on trays and offer a small side of fresh berries; theyre a simple, bright contrast that elevates the cheesecakes. For pairing, a salty side like crisp fries can highlight the creamy texture, though you can keep the focus on the cheesecakes alone. This approach travels well in the city, in the heart, and it pairs with delivery options, so you can share the joy beyond the counter.
Cooling and Serving: When and How to Slice for Clean Pieces
Chill the cheesecake for at least 4 hours in the refrigerator, or overnight, before slicing for clean pieces. Let it stand 15-20 minutes at room temperature to soften the center inside, just enough for smooth, clearly defined edges. This timeless method keeps slices neat for a breakfast spread, an office potluck, or a cherished trip with friends.
Gather a long, sharp knife, a hot-water bath, and a clean towel. Dip the knife in very hot water, wipe dry, and slice in one steady motion from the outer edge toward the center. If you plan many cuts, wipe the blade between slices to maintain crisp lines. For a standard 9-inch cake, eight slices offer generous portions, twelve provide smaller pieces mostly used for tasting or brunch plates. Remember: a well-prepped blade makes borders that stay neat instead of smearing inside the cake.
- Time and temperature: refrigerate for 4 hours minimum; 8-12 hours is ideal for the freshest interior crumb. Keep the cheesecake chilled at 2-4°C (36-39°F) until ready to slice.
- Knife technique: heat the blade, wipe, then use one smooth pass to cut from edge to center. Turn the cake slightly and repeat to form uniform wedges.
- Edge care: after each cut, wipe the blade and reset the angle to preserve straight lines; avoid sawing, which creates jagged edges.
- Serving or storage: transfer slices to plates with a broad, clean spatula. Serve immediately with a topping, or wrap and refrigerate for up to 2 days; bring to room temperature 15 minutes before serving for the freshest texture.
Serving ideas and tips:
- Fruit toppings: pineapple slices, berries, or a light fruit compote add brightness without masking the cheesecake’s richness. A thin leche glaze on the plate enhances the glossy finish, clearly elevating the presentation. Locals in the office often enjoy a simple burst of citrus to balance sweetness.
- Flavor notes: search for topping combinations that suit your crowd; others prefer a plain slice with a dusting of powdered sugar, while some fans go beyond with a caramel drizzle.
- Presentation: slice on a clean board or plate so the view of each piece remains neat; clearly defined edges help guests judge portion size without guesswork.
- Quality and expectations: if you notice a disappointment among guests, try a brighter topping or a fresh fruit garnish; soon the plate looks perkier and more inviting.
- Tips from internet bakers: keep the cake as cold as possible until serving, then bring slices to room temperature for 15 minutes to soften just enough for clean cuts and easy servings.
From a timeless routine to a refined finish, this approach keeps every slice looking pristine–from the first bite to the last. Don’t forget to plan ahead: standard portions fit most gatherings, but you can scale beyond by preparing extra slices for guests who search for a larger share or for a late-night breakfast run after a busy day.