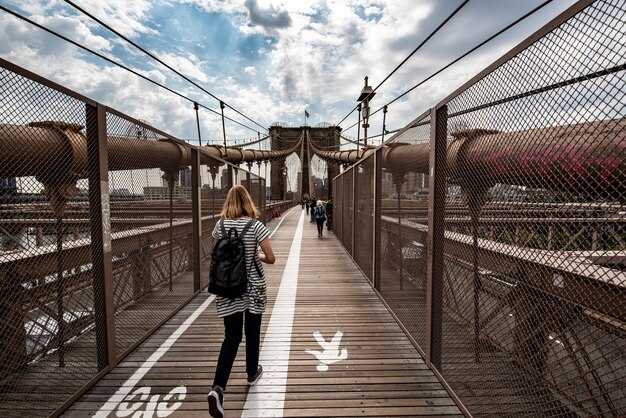
Begin your walk with a quick, concrete recommendation: step onto Squibb Park Bridge just as the afternoon light hits the water. This moment offers the ultimate panoramic backdrop of the skyline, with a built wooden deck that stays shaded for a comfortable stroll. Use it to explore the city’s rhythm and plan the best angles that capture the river glow and the tall silhouettes without rushing.
Where to start? From Brooklyn Heights, cross onto the bridge and follow a shaded, pedestrian-only path that links to the Brooklyn Bridge Park promenade. If you miss the moment, you’ll notice the changing backdrop as you move; keep a seasonal eye on light, and let native grasses along the edge sway with the breeze while you photograph from the street edge.
To maximize what you see, choose a late afternoon window when shadows lengthen and water sparkles. Bring an extra battery, and consider an audio guide or podcast to add context without distracting you. If you’re with someone, suggest a quick photo challenge: one person stays by the backdrop while the other captures panoramic shots along the street path. Click through your photos as you walk to keep your pace steady and collect the best captures.
Plan a small detour after the bridge: in the neighborhood around Squibb Park, you can pick up a coney dog at a nearby stand or grab a coffee while you ride the breeze along the waterfront. If you’d rather stay still, sit on a shaded bench and listen to an audio track that explains the bridge’s design and what you’re seeing in real time. This is the moment to choose your route and map a loop that includes native plants and a short street stroll by the water.
Seasonal tips help you tailor the visit: in summer, shade keeps you comfortable; in autumn, the colors along the river pop against the skyline; in winter, the cold light makes a clean, intimate scene. The walk takes about 20–30 minutes if you move steadily, or longer if you linger for photos and a quick snack. With this approach, you’ll come away with fresh impressions of Squibb Park Bridge and its place in the city’s riverfront scenery.
Squibb Park Bridge Walk: Practical Guide for NYC Visitors
Begin your walk at Squibb Park Bridge on thursday around golden hour to catch soft light on the harbor and snap the skyline. From there, follow the promenade toward the Brooklyn Heights side and appreciate the facade of nearby brick warehouses. Add a quick detour to galleries in DUMBO to enrich your walking experience with seasonal art.
Walking details: The walk stays largely on the waterfront, with a few stairs and ramps that connect to street level. The route offers modern views across the river and invites you to pop into galleries and seasonal storefronts along the way, giving a look at history and current culture.
Tricky sections and safety: On windy days, the mid-bridge stretch can feel tricky, so keep to the railing and take your snap when conditions allow. Be mindful during busy times of cars on adjacent streets and give pedestrians priority on narrow segments.
Helpful tips and tone: Bring water and light layers; talk with locals for quick exchange about history and the neighborhoods; this guide can help you keep moving and avoid backtracking. A quick reminder can help you stay on track. These tips are helpful for first-time visitors. The route is quite efficient and friendly for a compact tour around neighborhoods.
Seasonal timing and tips: thursday evenings often offer quieter streets and better light for great shots of the harbor and facade. The loop around the river invites walking, bird-watching along the water, and quick stops at galleries in the neighborhoods. If you want more depth, plan a tour with a local guide and exchange ideas with artists; this can be quite rewarding.
Best time of day for photos and crowd-free moments

Go at sunrise on weekdays to nab crowd-free, shaded moments along Squibb Park Bridge. Look toward the Manhattan skyline for magical light as the day begins, head to the railing for a comfortable, clear prospect of the iconic neighborhood. Please arrive early to claim a spot before others arrive, and simply enjoy the calm flow as the city wakes.
If you miss sunrise, plan for late afternoon. Weekday golden hour, roughly 4:30–6:30 pm, yields warm, picturesque tones and a quieter flow as crowds thin. Youre sure to find free, open-frame angles from either end of the span, with shaded corners where you can rest your eyes and your camera. This prospect pairs well with a quick tour or a casual long-lens walk.
To maximize results, choose spots that keep you looking over the water: a sheltered arc under the overhead structure provides a shady, free vantage, while the railing along the Brooklyn side offers sprawling views of the harbor. This view offers additional texture and perspective, which can be ideal for portraits or detail shots. For portraits or detail shots, switch to a closer spot that emphasizes texture and clean lines; simply adjust your position until the look aligns with your goal. Tips: arrive with a plan, bring a small tripod if you have one, and move between light and shade to stay comfortable and prevent squinting.
What you can see: landmarks and skyscrapers visible from the bridge
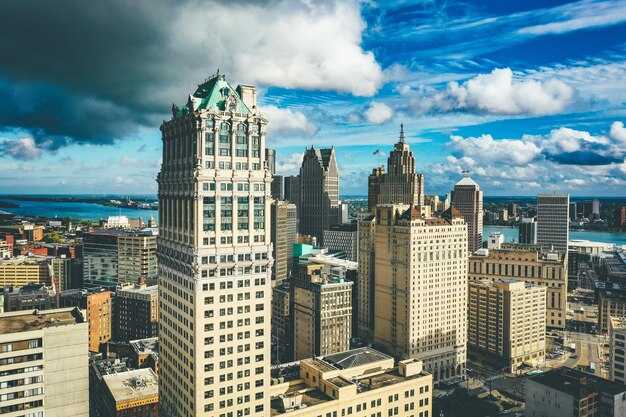
Cross the walkway slowly and fix your eyes on the Lower Manhattan skyline. The aforementioned towers rise along the waterfront, with One World Trade Center leading the line, followed by the Woolworth Building’s crown and the midtown silhouettes peeking over Brooklyn’s rooftops. From this long perspective, you’ll spot a group of iconic sights–glass giants, brick façades, and the occasional water taxi gliding by–visible from the open-air walkway that frames the river.
Along the rail, plaques recount the bridge’s origin and the neighborhood’s transformation from former warehouses to open spaces. If you’re in a group, compare angles to track the wall of towers from several perspectives and note how perspective shifts with the tide. Whatever pace you set, your perspective changes as you move along the railing.
For your first crossing, start at the midpoint and turn to the north to take in a broad vista. In minutes you can explore the waterfront from this vantage, your feet steady on the planked walkway. This part of your route keeps your pace flexible, whatever pace you walk. Look along the line of buildings to catch the balance of green parks and industrial relics like converted warehouse yards. Because seasonal kiosks dot the promenade, you’ll find snacks to enjoy while you pause at a point with the best skyline view. Consider stepping off the path at the center point to study plaques or to relax with the river as your backdrop.
How to get there: walking routes from the Brooklyn Bridge to Squibb Park
Exit the Brooklyn Bridge onto the Brooklyn side and follow Cadman Plaza West toward Montague Street; this direct route runs about 0.9 miles and should be your go-to option for a quick, scenic arrival at Squibb Park.
Route A: Cadman Plaza West, then Montague Street toward the water. Along this short walk you’ll see history-rich brick facades, views above the East River, and the skyline that gives the moment a very photogenic frame. It’s particularly nice at sunset or nights; there are plenty of benches for rest and spots to catch photos.
Route B: For a longer, more immersive option, after you cross into Brooklyn take a route through Dumbo: head along Main Street toward the river, join Water Street by the Empire Stores complex, then connect to Old Fulton Street and descend toward Squibb Park. This loop clocks in around 1.1 miles and delivers cobblestone charm, river breezes, and more opportunities to discover hidden corners along the waterfront.
Practical tips and extras: summers are lively, so consider an early start or a late-afternoon stroll to avoid the heat and crowds. If you want to extend the outing, you can catch a Governors Island ferry from Pier 6 nearby; that island creates a nice contrast to the city views you’ll watch along the way. There are plenty of free viewpoints and photo spots, plus a symbol of the borough’s history at the park’s overlook. You will find there are opportunities to watch ships pass and to take lots of photos; this route provides more than just a walk, it’s a chance to discover a classic Brooklyn waterfront. This is worth the effort and very enjoyable on calm evenings.
Accessibility and safety: stairs, ramps, and stroller-friendly details
Start at the fulton street entrance; theres a staircase with a sturdy handrail and a curb ramp at street level. If youre taking a stroller, use that entry and keep to the right along the first pier wall to avoid crowds and maintain a steady pace.
From the span, pedestrians enjoy a panoramic view, with green park edges nearby and stunning city silhouettes. There are much photo opportunities near the subway lines, and youll notice trains passing along the Fulton corridor beyond the seawall. Plan accordingly to minimize wait times and keep an eye on kids or pets.
Stroller-friendly details: the main route remains level for many steps, but keep in mind there are stairs at both ends; ramps exist at some approach points, though grade can vary. If you have a stroller, lean on the guardrails and pass single-file at narrow sections; avoid busy hours; the surface is wood, non-slip, with good traction even after rain; there’s enough width for pedestrians to pass, but still be mindful of others.
| Access point | Stairs | Ramps | Stroller-friendly notes | Practical tips |
|---|---|---|---|---|
| Fulton Street entry | Yes with handrails | Curb ramp at street level present | Wide approach, keep to the right near the wall | Visit in off-peak times; follow posted signs |
| First Pier entry | Yes | Ramp available in some sections | Allows single-stroller passage, watch for pedestrians | Take your time; yield to others and move through slowly |
If you have questions about accessibility, refer to the aforementioned signage and the staff location near the wall. That youll find these details useful adds much to your confidence and the overall prospect of enjoying a year-round, safe walk near the subway and the waterfront.
Photo and gear tips: composition, lighting, and gear for skyline shots
Set ISO 100, aperture f/9–f/11, shoot RAW, and mount a sturdy tripod on the deck to lock the skyline as the backdrop. Bracket 3–5 frames to cover highlights and shadows; youll feel the flow of light shift over minutes as a ferry passes and bronze towers glow. Please keep your time window flexible and explore the marked vantage points around Fulton Ferry Landing for fresh angles throughout the day. Only bring essentials to keep the setup manageable on a windy deck.
Composition
- Anchor the skyline with the horizon on the lower or upper third when the sky has texture; use the deck railing as leading lines toward the large city towers, and include a foreground element (a picnic blanket, a bottle, or a bronze sculpture) to add depth to the backdrop.
- Introduce layers to avoid a flat shot: place something green in the foreground or a nearby tree branch to frame the scene; this small detail helps the eye travel beyond the glassy river to the distant peaks.
- Exchange viewpoints with a friend or wander to another marked spot in the neighborhood; they were different moments with different light, and they often yield a noticeably fresh backdrop.
- Be mindful of midday light; if the sun is high, the tricky glare can flatten color, so look for a shallow bend in the river or a sheltered angle to reduce contrast.
Lighting and timing
- During golden hour, bronze tones spill across buildings and windows; blue hour adds a cool, reflective sheen on the water. Throughout the session, set WB around 5400–6000K for natural color, then adjust for sky drama as the light shifts.
- If you want motion, use a filter setup to run longer exposures; a 2–8 second exposure can blur water and clouds while keeping the towers sharp, creating a cinematic soundscape that complements the city silhouette.
- From midday to late afternoon, watch for changing areas of shadow along the river; these transitions create a gradual, cinematic flow that often leads to the ultimate city shot.
Gear checklist
- Lenses: a wide-angle zoom (14–24mm or 16–35mm) for full cityscape, plus a mid-telephoto (70–200mm) for tighter crops; on a smaller setup, a single wide prime (24mm) can cover most skyline moments.
- Tripod and remote: a sturdy tripod on the deck keeps shots sharp; a remote or timer helps avoid wind-induced shake and reduces the chance of misalignment when you exchange positions.
- Filters: circular polarizer to cut water and glass glare; ND filters for long exposures to smooth water and capture cloud movement; extra batteries and memory cards for longer sessions.
- Extras: a compact bag, a small towel for condensation, and a lightweight blanket or picnic gear for foreground interest if you want a casual feel.
- Vehicle awareness: be mindful of passing traffic on nearby streets; long exposures can exaggerate motion, so adjust timing to minimize rotor blur from street activity.
- Scout the Fulton Ferry Landing area to identify 2–3 marked spots with clear water and skyline visibility, then test frames at 1/125–1/250s for daylight or longer for moodier light.
- Set baseline exposure, dial in WB to the scene, take 2–3 test frames, and adjust; keep an eye on how light changes over time and use that to time your final shot.
- Build a final sequence by bracketing and selecting the best blend of sky and city; if you want motion, try a 2–8 second exposure with ND and compare with sharp frames for a composite, especially when a ferry or boat passes beyond the bridge.