
 The Best Cookie in New York City – A Must-Taste NYC Treat" >
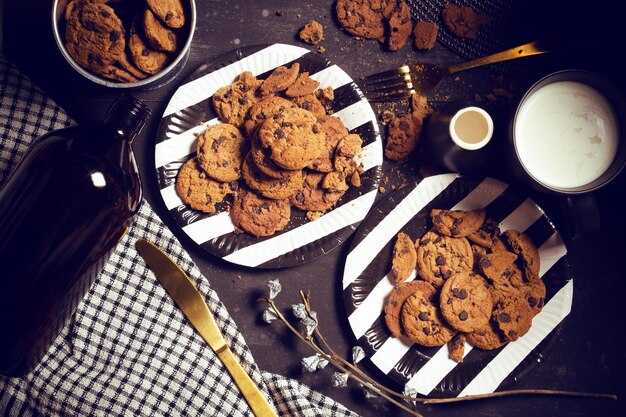
ニューヨークのベーカリーシーンの中心にある、チョコレートたっぷりのオートミールクッキーをぜひお試しください。ニューヨーク市で最高のクッキーです。今日、かぶりつくべきです。. 一口食べると、トーストしたオーツ麦、チップス、バニラの風味が絶妙なバランスで広がり、最後のひと口の後も長くその余韻が残ります。.
求める質感は、4つの要素から生まれます。それは、力強い オートミール 噛みごたえがあり、チョコレートがたっぷり詰まった チップス 光沢があり、ひんやりとしたバター風味のベース、そしてスタンド ミキサー すべてを均等に折りたたみ、オーブンから出したてを試食するときも、温かいおやつを手に街を歩くときも、楽々と食べられる均等な一口を生み出す組み合わせです。.
その香りは、まるでブルーリボンのような雰囲気で、手作りのお菓子の面影は、まるで祖母のレシピのように親しみやすいのに、モダンな仕上がりです。 注記 黒糖、バニラ、そしてほのかな塩味が甘さを抑えます。.
ファン共有 (笑) オーブンの唸りと生地の短い休憩中、概ね安定した結果でお菓子を 恋人たち 戻ってきます。それぞれ かじる もちもちのオーツ麦とカリッとした縁のバランスが取れており、冷めても味が落ちないのでご心配なく。一口で食べられるこのペアは、友人との持ち寄りにもぴったりです。.
マンハッタンで食べ歩きを計画しているなら、川沿いにあるこの店を地図に加えて、試食の時間を取りましょう。クッキーは持ち運びにも適していますが、オーブンから出して1時間以内に、温かいうちに食べるのが一番です。 風味豊かな ニューヨークの味は、大胆な風味の街で記憶に残る一口を求める地元の人々にも観光客にも満足していただけるでしょう。.
計画:ニューヨーク市で最高のクッキー
ニューヨークで最高のクッキーの基準点としてBraveTartを捉え、信頼できる結果でその成果を再現するために、この計画に従ってください。.
- テクニックとベース生地:無塩バターは柔らかくし、ブラウンシュガーとグラニュー糖を混ぜて使用します。白っぽくなるまで混ぜ合わせたら、卵とバニラを加えて混ぜます。小麦粉と塩ひとつまみを加え、さっくりと混ぜ合わせる程度にします。このテクニックにより、バター風味豊かで柔らかい生地になり、サクサクとした縁の、もっちりとした中心部を持つ、クッキーそのものを定義する食感が生まれます。.
- 風味のバランスと調整:バニラとひとつまみの塩を加えてください。エスプレッソパウダー、ココア、またはほんの少しの糖蜜など、いくつかの小さな調整を加えることで、生地を圧倒することなく味を高めます。ルカは、焼いているうちに香りが変化し、三度目の味見が他の味と相まって深みを出すとコメントしました。あなたは甘味と塩味のクリーンなバランスを探しました。.
- 焼き加減と見た目: 大さじ2杯分の生地をすくい、パーチメント紙に5cm間隔で並べ、175℃で9~11分焼きます。縁が金色になり、中心が柔らかい状態になったら焼き上がりです。最高の状態は、完全に固まる直前の状態を見極めることで得られます。焼き上がりの結果は、時間だけでなく、正確な焼き加減にかかっています。.
- 焼き上がり後の扱い:クッキーを天板の上で5分間休ませてから、網に移して完全に冷ましてください。この休ませる工程により、広がりすぎるのを防ぎ、風味が引き立ち、ぼろぼろとした食感ではなく、しっとりとした食感になります。.
- 一貫性と比較:小麦粉、水分量、休ませる時間を少しずつ調整しながら、何度か焼いてみてください。食感、香り、甘さについてメモを取りましょう。結果を記録し、どのオーブンでもうまくいくバージョンを選びます。この計画によって、再現可能な食感、香り、風味が実現し、マクドナルドのクッキーのような手抜きに誘惑されるのを防ぎます。.
そのクッキー自体は、バターの風味とバランスが取れており、目標を達成したことを確認する香りが残ります。計画、テスト、そして反復を重ねれば、ニューヨーク市で最高のクッキーを作り上げ、次回の投稿や試食会で共有する準備ができます。.
理想的な食感:縁はカリッとしていて、中心部はもちもちしている
350°Fで9~11分焼くと、縁はカリッと、中心はもちもちに仕上がります。この時間内で焼くと、中心部は焼き過ぎず、柔らかさを保ちながら、縁は金色に変わります。.
バター 1 カップ、グラニュー糖 1 1/4 カップ、ブラウンシュガー 1/2 カップ、小麦粉 2 カップ、バニラ小さじ 1、塩小さじ 1/2、チョコレートチップ 1 カップを使用すると、生地がまとまりやすく、過度に広がらない分量になります。作りたての生地は、この割合によく反応し、最小限の労力で一貫した結果が得られます。.
大さじ山盛りを2インチ間隔で並べて、パーチメント紙を敷いた天板に生地を広げ、中央のラックで焼きます。成形前に生地を15分冷やすと、端がよりカリッとなり、噛み応えが調整され、中心部の柔らかさを損なうことなく仕上がります。この方法により、バッチ全体の均一性が保たれます。.
変化をつけるには、色々な種類のチップス、ナッツ、ドライフルーツなどを使用しますが、ダークチョコレートの苦味で甘さのバランスを取ります。焼く際に縁を少し焦がすと、よりサクサクした食感が向上し、多くの人が期待するほのかなナッツの風味が加わります。単純なチャートに従った何千人ものテイスターが、この方法を他の方法よりも高く評価しており、彼らの分析によると、完全に硬い状態よりも、ほんの少しだけねっとりとした中心部を好む人もいます。.
ニューヨークの何千ものバッチを通して、この方法に従うことで、その魅力は増していきました。評価と分析によると、完全に固い食感よりもカリカリのエッジを好む人もおり、焼き時間、温度、間隔を調整することで、このバランスを保っています。.
低温で焼く:焦げ付かせずに焼成時間を延ばすには
オーブンを150℃に予熱し、均一なボール状に丸めた生地を、天板1枚につき12個並べ、12~16分焼きます。途中で天板の向きを回転させると、熱が均一になり、外側が焦げ付くのを防ぎつつ、中心部がしっとりとした状態を保てます。低温で焼く際の基本として、この設定をお勧めします。最初のバッチを注意深く観察し、必要に応じて微調整してください。.
制御 結果次第 factors 生地の厚さ、砂糖の種類、バターの温度、型の色を調整できます。薄い生地は早く焦げ付き、厚い生地は時間がかかります。 塩味がきいている 甘さを和らげるバター、白い砂糖はよりサクサクした縁を生み出し、ブラウンシュガーを少し加えるとモチモチ感が増します。より明るい風味には、 レモン 風味; 生地を home 温度を上げすぎないように注意してください。もしご希望であれば、 additional 延長する場合は、オーブンの温度を135~145℃に下げ、1バッチあたり2~4分追加します。焦げ付きが早い場合は、さらに5~10度温度を下げ、バッチごとに1分間休止します。.
相性の良い旅のフレーバー: レモン 〜を加える クルミ; white chocolate with レモン zest; chocolate chips with a pinch of salt. Keeping the interaction simple helps you control outer browning. Although you extend time, you still get light centers and a gentle chew. Those lovers of classic cookies will notice how the low temperature preserves moisture. This approach uses multiple steps and works for west coast inspiration adapted to NYC kitchens.
Notes on technique: parchment and spacing matter. For krolls-style spacing, lay out cookies with room to spread. Notice how the center stays light and the edge develops a delicate crust. After removal, let cookies rest on the sheet for 2–3 minutes to finish cooking everything. For home bakers, this is a winner because it requires effort but yields consistent results that those 恋人たち of crisp exterior and tender centers will appreciate. The strategy blends west inspiration with NYC practicality, and it travels well with lemon, walnut, white chocolate, and chocolate chips.
Ingredient priorities: butter, sugar, flour ratios, and mix-ins
Proportion baseline guides texture: butter:sugar:flour 1:0.8:2.0, then adjust with mix-ins to shape the final cookie.
Butter matters most: use high-fat, unsalted butter and cream it with sugar until pale and fluffy, then hold the air for chewiness. Being a lover of cookies, I am inspired by a trip to Soho, where I learned to line the sheet with parchment to prevent sticking and ensure even bake, myself refining the method over time. Minimize stick by chilling the dough.
Sugar strategy: blend granulated and brown sugar for depth; about 60% granulated to 40% light brown keeps sweetness from overpowering, and it makes the center sweeter without mushing the edges. Because brown sugar adds moisture, adjust temp and bake time to keep edges crisp while the center stays tender; I take notes to hit a temp around 175–185°C (350–365°F) for even spread.
Flour handling: use all-purpose flour and measure by scoop-and-level to avoid a floury dough, then fold just until you see a cohesive mass. Maintain even distribution of salt and leavening to prevent hotspots; this helps the dough hold its shape when the oven temperature climbs, and it supports a uniform crumb.
Mix-ins: type and quantity matter; kinds of chips (dark, milk, or white) or nuts enrich texture. Distribute every mix-in evenly to each ball, and if you have a question about a type of mix-in, start with 0.5 cup per batch and adjust. Chip distribution should be everywhere in the dough, not clumped; when you bake, place the balls on parchment about two inches apart, though you may chill the dough first for tighter control. This approach makes the cookie with a crisp edge and a soft center, a true trip through a bakery in your own kitchen.
| Scenario | Butter | Sugar | Flour | Notes |
|---|---|---|---|---|
| Chewy, fat-forward | 1 | 0.8 | 2.0 | Brown sugar ~30% of sugar; bake at temp 175°C; parchment; chips evenly |
| Balanced | 1 | 0.9 | 2.15 | Brown sugar ~50% of sugar; chill 15 min; bake at 177°C |
| Crispier | 1 | 1.0 | 2.4 | Add 1–2 tbsp milk; bake at 180°C; spread reduced; chips abundant |
Practical technique steps: from cream to bake and cool
Start by creaming softened butter with white sugar for 2-3 minutes until pale and fluffy, then add added vanilla and a pinch of salt to sharpen the tangy, saltysweet balance. This approach gives a solid base you can keep for a strong appearance after bake.
- Measure and prep: set out 1 cup (227 g) unsalted butter, 1 cup white sugar, 1/2 cup brown sugar, 2 tsp vanilla, and 1/2 tsp salt. In a separate bowl whisk 2 1/4 cups (280 g) all-purpose flour, 1/2 tsp baking soda, 1/2 tsp salt. These quantities define the type and category of the cookie and help keep things consistent.
- Creaming stage: in a large bowl, beat butter with the sugars on medium speed 2-3 minutes until pale and fluffy; add vanilla and eggs one at a time, taking 15-20 seconds between additions. The mixture should take on a herrine-like gloss and be easy to scrape from the bowl; take care not to overmix once dry enters.
- Combine dry and wet: add dry ingredients in 2–3 batches on low speed until just combined; fold in 1 cup semisweet chocolate chips and 1/2 cup walnuts. If you want extra contrast, add white chocolate chips as well; these create melty pockets in every bite.
- Chill the dough: press plastic wrap on the surface and chill for at least 1 hour; for deeper flavor, chill 24-48 hours. Leaving the dough above the fridge can help the structure hold its shape; this step is vital because wasnt rested dough tends to spread, and wouldnt hold a neat edge.
- Prep to bake: heat oven to 350°F (175°C). Line sheets with parchment and scoop dough by 2-tablespoon portions, spacing about 2 inches apart. This spacing helps maintain a clean edge and prevents sticking.
- Bake and observe: bake 9-11 minutes until edges are set and centers look melty or molten; remove when the edges are lightly golden and the centers remain soft for a chewy finish. To avoid dryness, dont overbake; over baking would make the center tough. Be mindful to avoid over baking.
- Cool properly: let cookies rest on the sheet 5 minutes, then transfer to a wire rack to cool completely; this preserves appearance and prevents soggy bottoms. When cooled, they stay chewy and hold their shape well.
- Storage and uses: keep in an airtight container at room temperature for up to 5 days; these cookies fit the saltysweet category and work as a snack, a dunking treat, or a topping for ice cream. They also please mamans and friends alike; you can use them in a sandwich or crumble them for texture. If you cant resist, bake another batch soon; these factors – dough texture, chill time, and ingredient balance – determine the final things you’ll reach for in this category.
Local tasting plan: top NYC neighborhoods and bakeries to visit
Upper West Side starts your plan with Levain Bakery, where a signature cookie delivers a thick crust outside and a soft, gooey interior that tastes like a small celebration. Hours run 8:00–7:00, so pick up a warm one before they cool. Since this first bite sets the tone, you will see how this plan includes some of the city’s best goods, and the cookie itself shows how careful pacing creates a memorable day.
East Village follows with Milk Bar, home to the Compost Cookie and other playful flavours. Each option brings a different balance of sweetness and crunch, and you can pick two or three to compare. This example shows how a cookie line can surprise your palate; for a quick break, stroll toward Washington Square Park and notice the aroma lifting your mood.
Brooklyn – Greenpoint and Williamsburg add Ovenly to the plan, delivering cookies with a crisp crust and a soft centre, plus seasonal twists. joshua herrine notes that you will prefer evaluating two spots in this area to gauge texture and sweetness; myself, I’d taste an extra bite to feel the difference. The hours stay friendly, so a quick detour won’t slow the plan, and another spot can be added if energy holds.
Manhattan – Chelsea-Meatpacking adds Chip City, where cookies lean bold with thick chunks and peak warmth. This option offers a higher contrast to the classics, showing how goods can vary by shop. If you’re freezing outside, this spot provides a fast, satisfying finish and a clear sense of what you want next, including a bold flavour like espresso-chocolate.
Smart wrap-up plan: pick three to five options across these neighborhoods; this run includes a mix of textures and flavours. Since you will create your own ranking, you can identify which crust–soft balance you prefer and how each bite supports your final pick. If this feels difficult, slow down and savor the moment. The plan will be easy to follow if you control your pace and avoid long waits at each spot; you’ll enjoy the laughs and the learning as you go, and you’ll leave with a clear map for your next tasting.


