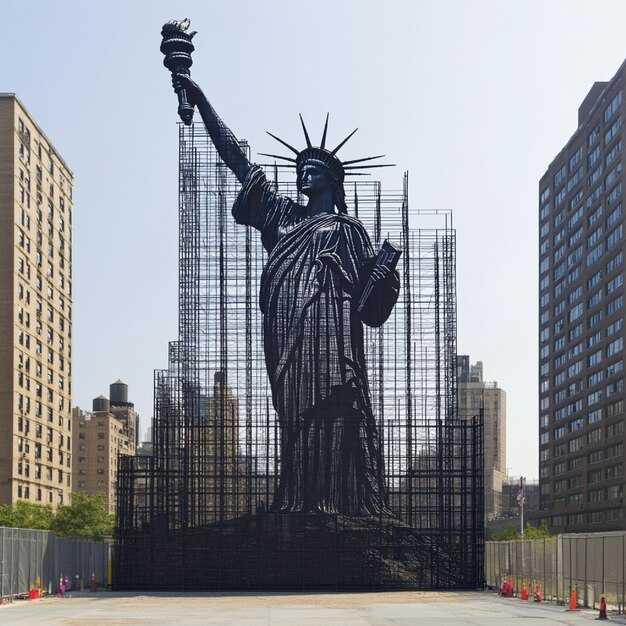
Start with the 14 photos that photographed the Statue of Liberty during construction in Paris, and trace the franco-american collaboration as it unfolded. This approach helps you see each phase, from early plans to ship arrivals and on-site work in the park beside the river.
Each frame shows a phase the project underwent, from the initial layout to the moment ironwork rose. You can know the sequence by the location cues and the right angles in the shots. Credits from bettmanngetty and mpistringergetty add authority, while darles provides close-ups that reveal texture and light on metal. The set aligns with centennial goals and january archival notes that kept the project visible to the public, enough context to understand the decisions, just to keep you informed.
In each frame you see how the park location, the right vantage, and the ship's deliveries shaped the build, with cranes and scaffolding guiding the eye from plan to assembly. The images help readers grasp the scale and craft behind the 14 shots, just enough detail to feel the pace, not as a gallery of pretty pictures, but as a compact record of how the project progressed.
For a quick takeaway, pick one photo from january that shows the first arch taking shape and compare it with the final frame to feel the pace of the work. The captions point to the exact location of each shot and the crews who collaborated across time and distance, culminating in this photo set you can explore with clarity and context.
Practical breakdown of the Paris construction photo series
Begin the series with a front view from the park where the timber scaffold begins to rise, framing the statue’s silhouette against a Paris sky. This first image sets tonal contrast and invites viewers to follow the build from bare metal to defined form.
Inside the musée workshop, switch to interior shots that reveal how a wooden board supports the growing model. You’ll see the skeleton behind the skin taking shape, and nearby a replica sits as a tangible gift from laboulaye to the city’s monuments.
In the Marais, use a balcony vantage to widen the view and include a small-group of visitors as a narrative thread. Find where the sculpture’s base bears latin inscriptions and roman numerals that echo classical design. Another angle can isolate a single observer to show scale.
These frames concentrate on the build before the skin covers the form, highlighting the skeleton, the wooden braces, and the board transitions from rough sketch to measured lines.
Plan your sequence with practical angles: a close-up on rough joints, a mid-shot from the park edge, and a long view that shows the statue framed by arches. The gift of context comes from including the model’s front facing shots and the interior workshop behind glass.
Before the final skin is applied, shoot detail columns of the façade and the 19th-century workshop rhythm. Mention laboulaye’s role in the project and how the statue became more than a memorial; it shaped democracy through shared memory.
Wrap with a final grouping shot in the park that links the front view to the interior craft, showing how these moments together reveal the process behind the statue’s emergence as a Paris monument.
Shot selection criteria for the 14 images
The process begins with a library-like collection of 14 frames: seven wide-context photos and seven tight-detail shots. This balance lets viewers connect the statue’s grand frame to the craft at work, and all images are photographed to tell a cohesive story.
Selection criteria center on light, composition, and storytelling. Each shot uses a deliberate approach: generous space around the statue to emphasize the internal rhythm of cranes and scaffolding, paired with close-ups that reveal inscribed details, textures, and the surface of metalwork. Examples of pairing context and detail, along with dawn glow and dusk shadow, repeat over months of work to display progress.
Details to track for the 14 shots include inscriptions on the pedestal, signage, and the hand of the craftsman. Each image should photograph a distinct element: pedestal inscription, structural joints, interior scaffolding, and the distant Parisian backdrop. The internal sequence ensures smooth transitions so the viewer feels movement through time.
Production involved a team of young photographers whose effort paid off. Funds supported gear upgrades; several frames were transferred to the project library for later display in the service gallery. Each shot has been curated to tell a moment, from champagne moments to the sound of hammering, without losing focus on the photograph craft and the final pictures.
| Image | Focus | Key Element | Criteria | Notes |
|---|---|---|---|---|
| 1 | Wide | Exterior context | Establish scale; balance skyline with scaffolding | Bridge to months of progress; library reference |
| 2 | Close | Inscribed pedestal | Readability of dates; texture of stone | Inscribed details highlighted |
| 3 | Medium | Structural joint | Craft of metalwork; clean lines | Internal lines emphasized |
| 4 | Close | Crane framework | Pattern of supports; depth of field | Examples of construction rhythm |
| 5 | Wide | Dusk lighting | Warm tone; silhouettes | Golden hour mood |
| 6 | Medium | Night site | Artificial lighting; reflections | Vivid atmosphere |
| 7 | Wide | River perspective | Context with water; long exposure | Connection to city life |
| 8 | Close | Work group | Human scale; interaction | Young photographers at work |
| 9 | Close | Inscribed plaque | Legibility; patina | Inscribed accuracy verified |
| 10 | Macro | Copper cladding | Texture; color shift | Craft emphasis |
| 11 | Medium | Public service area | Context with visitors | Service zone portrayed |
| 12 | Wide | Timeline view | Months of progress in one frame | Progress narrative |
| 13 | Medium | Celebration moment | Subtle storytelling; implied ceremony | Champagne hint without overstatement |
| 14 | Wide | Final display | Displayed sequence; ready for gallery | Colors balanced; pictures cohesive |
Locations and vantage points featured in the photos
Begin at the park’s riverside overlook to frame the statue against the Seine; this vantage gives you clear, cinematic pictures and a strong sense of place there. Move along with the sequence to discover each location’s character and how it supports the story of liberty in progress.
- Photo 1 – Park riverside overlook: you stand on the path facing the water; the piece’s workshop peeks behind planters, inviting you to find a calm, cinematic silhouette and to give the moment its first quiet glow.
- Photo 2 – Base on the quay: from the base along the quay, you stand centered as the pedestal rises; lampposts on either side frame the silhouette and guide the eye to the location.
- Photo 3 – Interior casting room: inside the interior workshop, a scale cast reveals the arm and torch; this shot invites you to learn about the process and the public gift of democracy.
- Photo 4 – Aerial view, location circa early days: an aerial frame over the location, circa 1900s, shows scaffolding and the layout of the site; you see how the project sits within the riverfront.
- Photo 5 – Beneath the base: from beneath the elevated base, you glimpse the mounting joints as workers stand and align components, giving a tactile sense of craft.
- Photo 6 – Mounted scaffolding around the torso: the mounted sections rise from the ground, and you can read the lines of the cast metal; this view emphasizes support and scale.
- Photo 7 – Glide along the Seine: a boat glide along the river captures the statue as a focal point against the riverbank; observe where the water meets stone and location aligns with the skyline, and give the eye a long line.
- Photo 8 – Lighthouse beacon: a lighthouse-like beacon on the quay creates a halo of light that highlights the metalwork as evening settles, adding drama to the composition.
- Photo 9 – Service corridor: a narrow service corridor within the yard offers a close-up view of the lines and tools; you feel the workflow behind the scenes in interior spaces.
- Photo 10 – Park terrace overlook: step onto a park terrace to frame the composition across the water; you can stand and watch reflections until the light shifts.
- Photo 11 – Donations and gift display: near the gate, a donations box and a gift display connect the project to public support; this location reminds you of the community’s role in liberty. Visitors may contribute until the end of the exhibition.
- Photo 12 – Elevated hill vantage: from a gentle hill above the site, the lines align with the city towers, giving a broad sense of context and location in the urban fabric.
- Photo 13 – Interior display on democracy and independence: in a museum-like interior, panels link liberty to democracy and independence, guiding you to reflect on the civic meaning of the project.
- Photo 14 – Evening wrap: at dusk, the mounted statue glows softly; the pictures capture a quiet moment into the memory and highlight the gift of liberty for all.
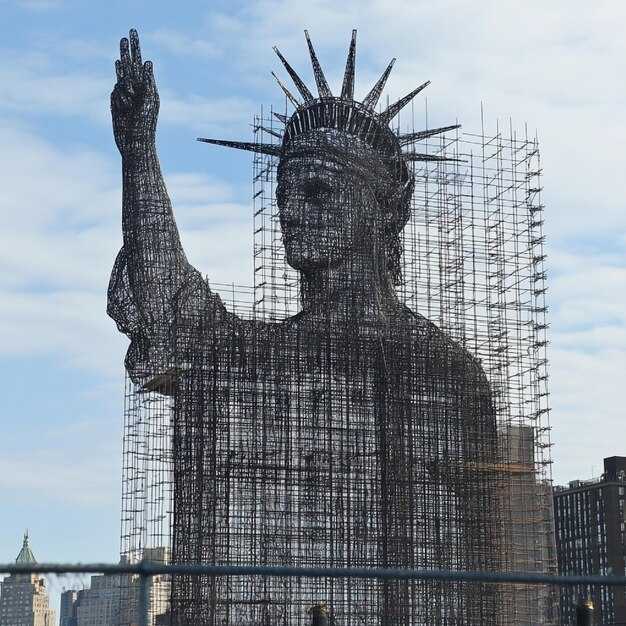
Visible stages and materials: what "under construction" reveals
Trace the progression by noting four milestones visible in the photos: the base anchored on the island, the wooden scaffolding rising around the frame, the long iron skeleton with hammered copper panels, and the final alignment checks that show the work taking shape only when these milestones align.
The base is granite, located on the island in the Seine, giving a solid foundation for the sculpture. An internal, naval-grade iron frame supports the copper skin, while wooden scaffolds and movable platforms let workers reach every curve. Copper sheets are hammered and riveted, then transferred from the studio to the site as ready-to-fit panels. laboulaye conceived the project, and donations from the americas and other patrons kept the work funded, with funds transferred as needed and a steady stay of crews until each stage could be checked. In january light, the texture and seams become part of the statue's narrative rather than a mere construction detail.
Photographic evidence offers examples of the workflow. Images credited to mpistringergetty and other photographers document the long rhythm of work: the iron skeleton rising under the copper, wooden scaffolds, and the hammering that seals seams. The lady on the island evokes classical grace akin to venus, while naval engineering keeps the scale true. Each image highlights the base, the wooden supports, and the workers who stay to adjust rivets and align curves. Since laboulaye conceived the project, these photographic records have preserved the sense behind the final statue.
From these details you can read the construction as a chain of examples of proper technique: start with the base on the island, then assemble the iron skeleton, apply copper sheets with hammered precision, and finally verify alignment against the surrounding buildings and river views. The process remains lengthy but highly organized; the donations and community support keep momentum, and the stay of skilled crews ensures each stage is completed well. The result carries laboulaye's vision forward, with january light marking milestones that connect a historical project to a present display.
Movement logistics: how the statue is relocated within Paris
Plan the relocation as a single-night operation along the Seine, with a river cruise escort and a carefully closed route past the Pont de Grenelle to minimize disruption for visitors. Notify nearby neighborhoods and provide courtesy updates for the press and international observers. Officially, the project is a joint effort among city services, arts institutions, and donor partners, with donations supporting specialized equipment and training.
-
Planning and governance
Before any gear moves, a dedicated assemblage of workers, engineers, conservators, and security leads meets for months to align timelines. The plan is designed to handle the monumental scale, including the height and weight of the replica, while keeping an eye on crown details and delicate edges. A copy of all permits and risk assessments is stored in the project office, and though the process runs tightly, the team keeps communications clear with the ambassador and international partners. Wallach, a noted conservator, participates to ensure the integrity of the surface during mounting and handling.
-
Route selection and timing
The routes are mapped to avoid narrow streets; early approvals from traffic authorities set a window for closures. The team outlines a river leg that uses a controlled cruise along the riverbank, then transitions to a road segment that passes under several arches and bridges. The route emphasizes safety margins around the wallach and other structural elements, with contingency options if wind or water levels shift. Though tight, the timetable aims to complete the assemblage transfer in a single night, reducing exposure for visitors and reducing public attention to surrounding areas.
-
Rigging, mounting, and scope
Technicians install a reinforced cradle and a heavy-lift frame mounted to purpose-built transport equipment. A hydraulic system lifts the statue with precision, while anti-sway controls maintain stable alignment during the aerial transfer. The equipment is chosen for the statue’s height and the uniformity of its surface, and it is designed to minimize vibration that could affect the crown area or other sculptural features. Workers coordinate with the crane operators, ensuring the load remains balanced throughout the move and that a back-up crane is ready if needed.
-
On-site operations and safety
Security perimeters are established well before the lift, with officials from arts agencies and local authorities overseeing access. A designated courtesy zone informs visitors about the operation and keeps sightlines clear for photographers and news crews. The operation uses a phased approach: hoist, rotate into the transport frame, and secure the assemblage for the transit. The team conducts a final check on mounting points and fasteners, then performs a test lift to confirm stability before the full move.
-
Documentation, communications, and funding
Documentation includes a detailed log, a route copy, and a post-move inspection report. The communications plan uses multiple channels to explain what looked like a routine relocation but is, in fact, an intricate orchestration supported by international partners and donations from arts patrons. A transparent briefing note explains the sequence to visitors and press, while a short fact sheet summarizes the height, weight, and safety measures. International arts networks share updates, and ambassadors from several nations observe the operation under careful supervision.
-
Post-move verification and display
After transfer, technicians verify mounting integrity and perform a controlled reassembly at the new site or pedestal. Official records capture the final alignment, with a high-resolution aerial scan used to compare the as‑built condition against the original assemblage. The crew prepares a courtesy report for local museums, visitors, and partners, confirming that the monumental statue remains faithful to its design and that all safety standards are met. The operation closes with a public display plan that respects the sculpture’s height and silhouette, ensuring the crown and form are preserved for generations of visitors to admire.
Safety, permits, and crowd control during urban shoots
Start with permits 4–6 weeks in advance by filing a formal autorisation de tournage with the city department responsible for public space and a separate AOT if you plan to close a street or square. Prepare a complete dossier that specifies dates, times, location plans, crew size, and vehicle movements. Secure proof of general liability insurance and, if required by the department, workers’ compensation, then assign a single liaison to handle approvals and on-site coordination. This is the effort that keeps a colossal project moving smoothly rather than stalling at a bottleneck.
Compile a detailed site plan that highlights the base for equipment, the assembly footprint for cameras and rigs, and the pedestrian safety perimeter. Include engravings or inscriptions on nearby historic features in your note only if you have written permission to interact with them; otherwise keep a generous buffer to protect any engraved elements. Outline access routes for the mighty crew, the boutique production office, and any equipment trucks, and indicate safe zones for the ladies and visitors who pass by during the shoot. The plan itself should be clear, concise, and easy for police or museum staff to read at a glance.
Design a crowd-management approach with a dedicated public liaison and clearly marked barriers. Set up controlled entry and exit points, and maintain a leisurely pace for pedestrians, guiding them with courtesy rather than force. For a shoot near popular sites, plan a buffer of at least 2 meters between the crew and the public and 3–4 meters where public gathering is heavier. Assign 4–6 trained security personnel per 100 meters of active frontage to handle queuing, photo requests, and emergency access. A well-structured plan minimizes disruption for peoples who merely enjoy the view and for families visiting nearby facilities like a small boutique library or a café line along the path.
Choose shooting windows strategically: mornings before peak crowds or late afternoons when tourist flows subside. For a 2–4 hour shoot, allocate 30–60 minutes for set-up, 60–120 minutes for principal takes, and the remainder for wrap-up and equipment breakdown. If you aim to evoke an urban, Manhattan-like vibe, coordinate similarly with local authorities to avoid peak transit times or school departures. Keep drone use under strict control and only with explicit written permissions from the department and, if applicable, the Louvre or other cultural sites along the route.
Coordinate with cultural-site guidelines when the route passes near monuments or museums. If the plan touches the Louvre’s vicinity or surrounding squares, obtain site-specific approvals and respect posted hours, pedestrian flows, and photography rules. Treat the area with the same respect you would give a 19th-century landmark: avoid obstructing entrances, entrances to the petite courtyards, or access to the linguistic or Latin-language archives housed nearby. In practice, that means pre-briefing staff on courtesy, keeping noise to a minimum, and adjusting the schedule to accommodate museum hours and public programs rather than forcing a rigid timetable from Laboulaye’s era to Lebart’s time. The goal is to protect the sculpture itself and maintain a safe, respectful pace for all visitors who come to enjoy the scene and the surrounding cultural fabric.
When it comes to historical context, acknowledge the project’s origin as a reflection of a collective effort rooted in 19th-century Parisian heritage. The base and assembly areas deserve careful planning, and any engraving or inscription on nearby features should be treated with care and permission. The overall approach–courtesy, precise permits, and a well-managed crowd plan–ensures a professional result without compromising public safety or the spirit of the surrounding spaces, from the Latin corners of the city to the grand façades mirrored in the Seine.
Tips for photographers: gear, settings, and timing to capture motion
Set up a sturdy tripod, mount a 6–10 stop ND filter, and start with a 2–4 second exposure at around f/8 to keep motion smooth and details sharp; this approach makes the motion photographed with calm clarity, and you can click the shutter again as the wind begins to shift around the city.
Choose a versatile lens kit: 24-70mm for broad context and 70-200mm for tighter silhouettes of the lady and construction; use a remote shutter to avoid camera shake, and bring a circular polarizer plus a neutral-density filter for layered textures; ensure access to the best viewpoints, and upload the files transferred to your department for review; a cleveland photographer would appreciate the discipline here.
Settings basics: shoot RAW, set white balance to 5200K or manually lock it, keep ISO 100–400, aperture f/8–f/11, and vary shutter from 1/2–4 seconds for motion trails to a few tenths for staccato elements; use manual focus or focus peaking, and apply a steady technique that keeps moving parts crisp while keeping the background soft; hammered details in the foreground can enhance texture if you balance exposure.
Timing strategy: plan around light when the sky paints a city glow, typically blue hour and early twilight; watch wind direction because gusts begin to weave lines through flags, cranes, and banners; aim for a mighty balance between motion blur and sharp edges; frame from an elevated or interior vantage for an aerial view that adds depth; think of Auguste and Petit guiding the composition.
People and story: compress crowds with a longer lens to isolate a single look, or let a few silhouettes add scale; americans often gather along the rails, so time shots to catch their click moments without disrupting the scene; capture the interaction between the statue, scaffolding, and light to make the final prints sing; the taste of light and motion should feel natural, not forced.
Post and share: export high-bit RAW to TIFF or PSD, apply light sharpening for prints, and preserve natural color; transfer files to your archive with clear naming so you can reuse the setup later, and label the final version with the city context for easy access; the exported file made for archiving.