

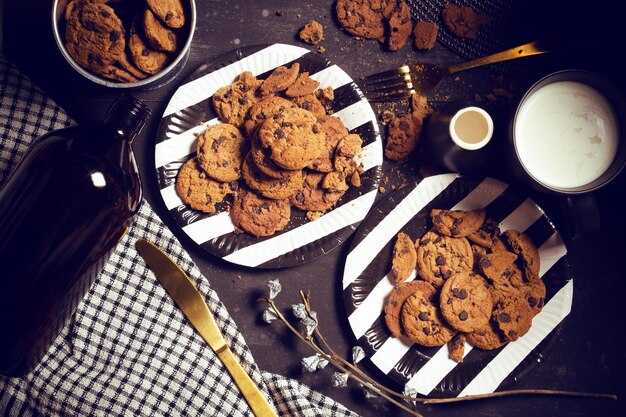
Try the chocolate-packed oatmeal cookie at the heart of NYC’s bakery scene–it’s the best cookie in New York City, and you should bite into it today. The first bite reveals a flavorful balance of toasted oats, chips, and vanilla notes that linger long after the last crumb.
Four elements shape the texture you crave: hearty oatmeal that keeps a chew, chocolate-packed chips that glisten, a cool, butter-forward base, and a stand mixer that folds everything evenly. This combo creates an even bite that seems effortless to pull off, whether you’re sampling fresh from the oven or grabbing a warm treat as you walk the block.
The aroma carries a blue ribbon vibe, and the resemblance to home-baked treats feels close to a grandmother’s recipes, yet with a modern finish. Those notes of brown sugar, vanilla, and a subtle salt kiss reduce sweetness.
Fans share laughs as the ovens hum and the dough rests briefly, mostly consistent results that keep cookie lovers returning. Each bite confirms the balance between chewy oats and crisp edges, and dont worry–the flavor holds after cooling hours. This four-bite pairing travels well with friends.
If you plan a food crawl across Manhattan, map this stop near the river and spare some minutes for a tasting session. The cookies travel well, but they’re best enjoyed warm, preferably within an hour of exit from the oven. This flavorful NYC treat will satisfy both locals and visitors who crave a memorable bite in a city of bold flavors.
Plan: The Best Cookie in New York City
Take bravetart as the baseline for the best cookie in New York City and follow this plan to reproduce that payoff with reliable results.
- Technique and base dough: Use softened unsalted butter and a mix of brown sugar and granulated sugar. Cream until pale, then beat in an egg and vanilla. Fold in flour with a pinch of salt just until combined. This technique yields a buttery dough that stays tender, creating a chewy center with a crisp edge – the texture that defines the cookie itself.
- Flavor balance and tweaks: Add vanilla and a pinch of salt; adding several small adjustments–espresso powder, cocoa, or a hint of molasses–heightens tastes without overpowering the dough. Luca commented that the aroma shifts as it bakes, and the third taste plays off the others to reveal depth; you looked for a clean balance between sweetness and salt.
- Bake window and appearance: Scoop dough into 2-tablespoon mounds, space 2 inches apart on parchment, and bake at 350°F for 9–11 minutes. Look for edges that turn golden and centers that stay soft; the payoff itself comes from catching the moment just before full set. The results depend on a precise bake, not on time alone.
- Post-bake handling: Let cookies rest on the sheet for 5 minutes, then transfer to a rack to cool completely. This post-rest step prevents excessive spreading and helps flavors bloom, ensuring a chewy bite rather than a crumbly one.
- Consistency and comparison: Bake several batches with small adjustments to flour, hydration, and resting time. Take notes on texture, aroma, and sweetness. Record results and pick the version that works across ovens. This plan yields repeatable texture, aroma, and flavor, avoiding the shortcuts that mcdonald cookie might tempt you to try.
The cookie itself remains buttery and balanced, with a lingering aroma that confirms you hit the target. Plan, test, and iterate, and you’ll achieve the Best Cookie in New York City–ready to share at the next post or tasting.
Define the ideal texture: crisp edges with a chewy center
Bake at 350°F for 9–11 minutes to yield crisp edges with a chewy center. This window barely overbakes the center, keeping it soft while the rims turn golden.
Using 1 cup butter, 1 1/4 cups granulated sugar, 1/2 cup brown sugar, 2 cups flour, 1 teaspoon vanilla, 1/2 teaspoon salt, and 1 cup chocolate-packed chips, the amount creates dough that holds together without spreading excessively. Freshly prepared batches respond well to this ratio, ensuring consistent results with minimal effort.
Spread dough heaping tablespoons about 2 inches apart on parchment-lined sheets and bake on the center rack. Chilling the dough for 15 minutes before shaping helps achieve crisper edges and a controlled chew, doing so without sacrificing the center’s softness. This approach ensures consistency across batches.
For variety, use assorted chips, nuts, or dried fruit, but let bitterness from dark chocolate balance sweetness. Toasting the edges slightly during baking enhances crispier texture, adding a subtle nutty note that many diners expect. Thousands of tasters, following a simple chart, rated this approach higher than other methods, and their analysis shows that some prefer a center that remains just barely chewy rather than fully firm.
Across thousands of NYC batches, following this method, their appeal grew. The rating and analysis show some diners prefer the crispier edge to a fully firm bite, and this balance is kept by aligning bake time, temperature, and spacing.
Low-temperature baking: how to extend bake time without burning
Set your oven to 300°F (150°C) and bake uniform balls, 12 per sheet, for 12–16 minutes. Rotate halfway to keep heat even and prevent outer edges from burning while the centers stay chewy. I recommend this setup as your baseline for low-temperature baking–make sure to watch the first batch and note anything that might require a slight tempo tweak.
Control the outcome with factors you can adjust: dough thickness, sugar type, butter temperature, and pan color. Thinner dough browns fast; thicker dough needs longer time. Use well-salted butter to balance sweetness; white sugar yields crisper edges, while a touch of brown sugar adds chew. For brighter notes, add lemon zest; keep the dough at home temperature to avoid spreading too much. If you want additional extension, lower the oven to 275–280°F (135–145°C) and add 2–4 minutes per batch. If something browns too quickly, drop the temperature by another 5–10 degrees and pause for a minute between batches.
Flavor combos that travel well: lemon zest with walnut; white chocolate with lemon zest; chocolate chips with a pinch of salt. Keeping the interaction simple helps you control outer browning. Although you extend time, you still get light centers and a gentle chew. Those lovers of classic cookies will notice how the low temperature preserves moisture. This approach uses multiple steps and works for west coast inspiration adapted to NYC kitchens.
Notes on technique: parchment and spacing matter. For krolls-style spacing, lay out cookies with room to spread. Notice how the center stays light and the edge develops a delicate crust. After removal, let cookies rest on the sheet for 2–3 minutes to finish cooking everything. For home bakers, this is a winner because it requires effort but yields consistent results that those lovers of crisp exterior and tender centers will appreciate. The strategy blends west inspiration with NYC practicality, and it travels well with lemon, walnut, white chocolate, and chocolate chips.
Ingredient priorities: butter, sugar, flour ratios, and mix-ins
Proportion baseline guides texture: butter:sugar:flour 1:0.8:2.0, then adjust with mix-ins to shape the final cookie.
Butter matters most: use high-fat, unsalted butter and cream it with sugar until pale and fluffy, then hold the air for chewiness. Being a lover of cookies, I am inspired by a trip to Soho, where I learned to line the sheet with parchment to prevent sticking and ensure even bake, myself refining the method over time. Minimize stick by chilling the dough.
Sugar strategy: blend granulated and brown sugar for depth; about 60% granulated to 40% light brown keeps sweetness from overpowering, and it makes the center sweeter without mushing the edges. Because brown sugar adds moisture, adjust temp and bake time to keep edges crisp while the center stays tender; I take notes to hit a temp around 175–185°C (350–365°F) for even spread.
Flour handling: use all-purpose flour and measure by scoop-and-level to avoid a floury dough, then fold just until you see a cohesive mass. Maintain even distribution of salt and leavening to prevent hotspots; this helps the dough hold its shape when the oven temperature climbs, and it supports a uniform crumb.
Mix-ins: type and quantity matter; kinds of chips (dark, milk, or white) or nuts enrich texture. Distribute every mix-in evenly to each ball, and if you have a question about a type of mix-in, start with 0.5 cup per batch and adjust. Chip distribution should be everywhere in the dough, not clumped; when you bake, place the balls on parchment about two inches apart, though you may chill the dough first for tighter control. This approach makes the cookie with a crisp edge and a soft center, a true trip through a bakery in your own kitchen.
| Scenario | Butter | Sugar | Flour | Notes |
|---|---|---|---|---|
| Chewy, fat-forward | 1 | 0.8 | 2.0 | Brown sugar ~30% of sugar; bake at temp 175°C; parchment; chips evenly |
| Balanced | 1 | 0.9 | 2.15 | Brown sugar ~50% of sugar; chill 15 min; bake at 177°C |
| Crispier | 1 | 1.0 | 2.4 | Add 1–2 tbsp milk; bake at 180°C; spread reduced; chips abundant |
Practical technique steps: from cream to bake and cool
Start by creaming softened butter with white sugar for 2-3 minutes until pale and fluffy, then add added vanilla and a pinch of salt to sharpen the tangy, saltysweet balance. This approach gives a solid base you can keep for a strong appearance after bake.
- Measure and prep: set out 1 cup (227 g) unsalted butter, 1 cup white sugar, 1/2 cup brown sugar, 2 tsp vanilla, and 1/2 tsp salt. In a separate bowl whisk 2 1/4 cups (280 g) all-purpose flour, 1/2 tsp baking soda, 1/2 tsp salt. These quantities define the type and category of the cookie and help keep things consistent.
- Creaming stage: in a large bowl, beat butter with the sugars on medium speed 2-3 minutes until pale and fluffy; add vanilla and eggs one at a time, taking 15-20 seconds between additions. The mixture should take on a herrine-like gloss and be easy to scrape from the bowl; take care not to overmix once dry enters.
- Combine dry and wet: add dry ingredients in 2–3 batches on low speed until just combined; fold in 1 cup semisweet chocolate chips and 1/2 cup walnuts. If you want extra contrast, add white chocolate chips as well; these create melty pockets in every bite.
- Chill the dough: press plastic wrap on the surface and chill for at least 1 hour; for deeper flavor, chill 24-48 hours. Leaving the dough above the fridge can help the structure hold its shape; this step is vital because wasnt rested dough tends to spread, and wouldnt hold a neat edge.
- Prep to bake: heat oven to 350°F (175°C). Line sheets with parchment and scoop dough by 2-tablespoon portions, spacing about 2 inches apart. This spacing helps maintain a clean edge and prevents sticking.
- Bake and observe: bake 9-11 minutes until edges are set and centers look melty or molten; remove when the edges are lightly golden and the centers remain soft for a chewy finish. To avoid dryness, dont overbake; over baking would make the center tough. Be mindful to avoid over baking.
- Cool properly: let cookies rest on the sheet 5 minutes, then transfer to a wire rack to cool completely; this preserves appearance and prevents soggy bottoms. When cooled, they stay chewy and hold their shape well.
- Storage and uses: keep in an airtight container at room temperature for up to 5 days; these cookies fit the saltysweet category and work as a snack, a dunking treat, or a topping for ice cream. They also please mamans and friends alike; you can use them in a sandwich or crumble them for texture. If you cant resist, bake another batch soon; these factors – dough texture, chill time, and ingredient balance – determine the final things you’ll reach for in this category.
Local tasting plan: top NYC neighborhoods and bakeries to visit
Upper West Side starts your plan with Levain Bakery, where a signature cookie delivers a thick crust outside and a soft, gooey interior that tastes like a small celebration. Hours run 8:00–7:00, so pick up a warm one before they cool. Since this first bite sets the tone, you will see how this plan includes some of the city’s best goods, and the cookie itself shows how careful pacing creates a memorable day.
East Village follows with Milk Bar, home to the Compost Cookie and other playful flavours. Each option brings a different balance of sweetness and crunch, and you can pick two or three to compare. This example shows how a cookie line can surprise your palate; for a quick break, stroll toward Washington Square Park and notice the aroma lifting your mood.
Brooklyn – Greenpoint and Williamsburg add Ovenly to the plan, delivering cookies with a crisp crust and a soft centre, plus seasonal twists. joshua herrine notes that you will prefer evaluating two spots in this area to gauge texture and sweetness; myself, I’d taste an extra bite to feel the difference. The hours stay friendly, so a quick detour won’t slow the plan, and another spot can be added if energy holds.
Manhattan – Chelsea-Meatpacking adds Chip City, where cookies lean bold with thick chunks and peak warmth. This option offers a higher contrast to the classics, showing how goods can vary by shop. If you’re freezing outside, this spot provides a fast, satisfying finish and a clear sense of what you want next, including a bold flavour like espresso-chocolate.
Smart wrap-up plan: pick three to five options across these neighborhoods; this run includes a mix of textures and flavours. Since you will create your own ranking, you can identify which crust–soft balance you prefer and how each bite supports your final pick. If this feels difficult, slow down and savor the moment. The plan will be easy to follow if you control your pace and avoid long waits at each spot; you’ll enjoy the laughs and the learning as you go, and you’ll leave with a clear map for your next tasting.


